Saturday, January 15, 2011

Butter Chicken Fail?

I have realized that Indian Butter Chicken needs an awful lot of cumin.Then again, I don't ever really use cumin, and I wasn't supposed to use it in the first place >.<

Anyways, I decided on a whim this morning that for lunch the family would have some deliciously cultural Butter Chicken. The only other time I have eaten butter chicken was when my sister was in grade 9 and brought it home from her foods class with a piece of naan bread soaking in it. It was delicious though! Before I ever saw it, I thought it was a whole chicken thoroughly soaked in melted butter and roasted before being fried in a large vat of boiling butter. Now I know that 1: Butter burns like heck so you can't fry anything with pure butter and 2: Butter Chicken is like bite sized chicken in this spiced cream/milk and tomato sauce.

I subscribed to that allrecipes newsletter thing and because I rarely check my email, about once a month I have to go through it and check about 180 messenges or so from allrecipes :( The good thing is, I found that SUPER easy butter chicken recipe! It calls for cream, garam masala and tandoori masala, which I had absolutely none of, but that was ok. Here's my altered version, but I'll post the original at the bottom of my post. This makes enough for 2-4, depending on how much you eat.

This is the substitute for the garam masala. Mix all the ingredients together ahead of time in a custard cup-super easy! It makes approx. the amount needed for this recipe.
1/4 tsp cumin
1/4 tsp paprika
1/8 tsp cinnamon
1/8 tsp cayenne pepper
1/8 tsp crumbled bay leaves
1/16 tsp ground clove


 For the tandoori, just use a guideline of 75% cumin and 25% paprika. Now you're set to go!


Butter Chicken Ingredients:

2 tablespoons olive oil or butter
3 1/2 tablespoons flour
2 cups of regular milk
1/4 cup butter
1 cup of tomato sauce
3/4 tsp garam masala
salt to taste
cayenne pepper (optional-I left it out)
1 cup frozen veggies

1 tablespoon butter
1 or 1/2 onion, minced
2 tsp garlic cloves, minced

11/2 - 2 cups diced cooked chicken breast cubes
1 tablespoon (or to taste) tandoori masala


Because I have no cream, I used the white sauce technique with the olive oil, flour and milk to thicken the milk into a cream-like consistency. (At least as close as I can get to it)

Just heat up the oil in a medium saucepan a bit and add the flour. Whisk well until it looks like a lumpy ugly paste of sorts. (Sorry, no pictures) Make sure you stir this constantly because it will burn incredibly easily. If the paste looks more like flour frying in a bunch of oil, add a bit more flour. Cook the paste for about 5 minutes, or until it doesn't smell starchy anymore. Then turn the heat off and SLOWLY, gradually add the milk, mix well so there are no lumps at all. Now the milk might seem too runny, but just start heating it up on medium again and let some extra water evaporate while whisking it. It doesn't burn as easily at this stage so you can leave it for short periods at a time.

While your cream is processing, melt the 1 tablespoon butter on low and slowly caramelize the onions with the garlic.. It will take a while, but you can leave it for a while without it burning.

When your milk has thickened enough for your taste, add the butter, tomato sauce, salt and cayenne. NOT the veggies yet! Now bring it on a LOW simmer (Don't want it to burn!) and let it simmer for 30 minutes, stirring ocassionally.

When your onions are done, set it aside. Now toss your chicken with the tandoori masala (if you really want-curry powder works too) in a bowl and set aside. I bought a rotisserie chicken from my supermarket and this was the leftovers. There wasn't nearly enough, so I added a bunch of frozen cooked shrimp as well.

After simmering for 30 minutes, add the onions/garlic to the sauce and simmer for another 12 minutes, adding the veggies halfway. Meanwhile, saute your chicken in a bit of oil in the skillet or wok. The shrimp gave off an awful lot of water, so I had to cook the water off before adding the sauce. Mix the sauce together with the chicken. If it seems to watery, cook some of the water off until it is your desired consistency.

Place on a serving plate and garnish with cilantro. Eat it with some rice, or this even makes a great Butter Chicken sandwich. :) Enjoy guys!

It looks a tad like stew...


 What do you think? Win, or fail?


Want the regular recipe? It makes about 50% more, so it will ask for more ingredients than the altered version. CLICKIE

Thursday, January 6, 2011

Amigurumi Love

***sidenote: Blogger kept crashing on me, so this is my third time trying to publish something today***

They are the cutest little bastards EVER! An Arigurumi is a small, crocheted doll. The word originates from Japan, and they are usually in the form of some adorable animal. Here in North America, the term Amigurumi tends to refer more to larger crocheted animals.

You should tell by now that I am practically dying to make an Arigurumi doll right now. I definately cannot handle the Cuteness (with a capital C) of these. My knowledge is a bit limited--I barely know how to crochet, although I have made a white crocheted hat before. What I do know is that it is quite simple. I've read a few articles on what you need to get to start your own animal.

1. Materials
Materials are just a bit vague-and you'll probably have them if you crochet a bit.

A size G/4.25mm or F/3.75mm hook.
- These are the most commonly used hooks for arigurumi, But sometimes it can go up to an 8H/5mm hook. If the pattern doesn't specify, look at your yarn label and get a 1 or 2 smaller a size than recommended.

Yarn
- Typically, it's worsted weight. But some patterns will tell you what to get, and if you're making your own pattern; what the hey! Get any yarn you want!

Yarn Needle
- The yarn needle is used to sew different parts of the amigurumi together; like the tail, or the ears.

Polyester Fiberfill
-Basically: stuffing. A bag of fiberfill will probably give you plenty enough to make a bunch of these guys.

2. Stitches
 -Some must know stitches/techniques are:
              - Magic Circle
              - Single Crochet
              - Decreasing
              - Increasing
              - Chain (obviously)
              - Working in the round

I think that's it! Amigurumi basics, that's all. I found a wonderful other blog teaching you these things: Click Here. You could also look on Youtube as well. For free patterns, Google them. There's tons floating around on the internet. I recomend searching the lionbrand Amigurumi patterns. They have pictures of the finished product and look pretty easy.

I can't wait for the weekend! Right now for the finals coming up, I barely have any room to cram info in my head during schooldays. D: Plus I need to finish that knitting.

I hope you guys DO try this out. It's really fun, I've been told, and all the end products look great!


ARE NOT THEY CUTE? :)

Tuesday, January 4, 2011

Half a Knitters MILE stone!!!

Dear all: I have reached half a knitting milestone. That is all.

I rather like this picture

it goes on and on and on...
It's actually big enough to make a dress

Do you see how big the thing is? No? Well, here's less of a pretty picture for comparable sizing
                                                                     
                                                                     
And another less than pretty pic
 Not bad for an amateur knitter methinks :)    


I finished these about two days ago. HALFWAY done! I came across this knitted stole pattern (I know-- 'stole' sounds weird) and blindly started it. It only took a quick trip to Wal-Mart for a big ball of yarn the color my receiver wanted and then 30 minutes desperately searching through my cardboard box of supplies before this project got underway.

When I first started this, it had been way too long since I had touched a knitting needle. It took about 2 months to get the border done because I kept undoing it. *sigh* But then it took about a month of furious knitting before the project reached that size.

This pattern calls for two 2 1/2 foot pieces to be knitted and then grafted together on the top with a Kitchener stitch. Let me tell you; I have no idea what the Kitchener stitch is. I know it vaguely connects to sock knitting, and that it all. But that's what Youtube and Google is for, right? Well, I moved my piece of knitting to another needle that I wasn't using. And suddenly

TADA! HALF A MILESTONE!

This stole is my first project that I have attempted to really, truly complete. My first big project, anyway. Now, unfortunately, comes the heavy other half of this particular milestone. Another 2 1/2 foot piece.
pathetic.
 What I really find amazing is that I finished the border of the second part in just 2-3 hours. Which is great compared to two months and considering how slow I am.

      Here's how the new piece looks ~-~-~-~-~-~-~-~-~-~->


 <~-~-~-~-~-~-~   And compared to the big piece


 It's quite teensy. But to think of it, it looks like a great ruffle. :)


As I have said; that is all.

Monday, January 3, 2011

Nommable roots?

EAT IT! Chock full o' healthy good stuff (of god knows what) and chewy-ishly yummy at the same time. Know what it is? ? Cassava. Cassava roots, in a cake. I've come across a couple odd cakes or two, (make way for POTAHTO cake!)  but this one was sort of familiar, because it's also called Cassava Bibinka. *What a coincidence! I like bibinka!* Cassava Cake is from the Philipines, where cassava roots are abundantly found. Here in North America, not so much. Except maybe in Mexico, I've never been there. I found this wonderfully easy cassava cake recipe, which only requires you to take a short trip down to your local Filipino goods store or T&T if you have it there.

***If you don't want to scroll all the way through the posts, I'll put the recipe in a clump down below.***

What you need is;

2 packages of frozen grated Cassava.
1 bottle Macapuno (coconut strips)
1 can condensed milk
1 can coconut milk
1/4 cup butter/margarine, melted.

You'll need to defrost the cassava packages in the fridge overnight, or in the microwave, first. A bunch of water will leak out, so be sure you put it in a bowl. For the Macapuno, you can just use 1/2 the bottle, if you've got a superbly keen addiction of sweetness, feel free to put the whole bottle in!

preservatives much? ;)

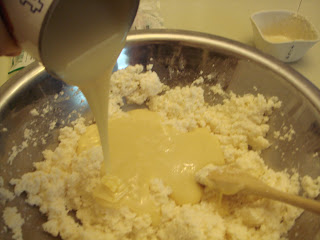
This makes a 2-quart dish of cassava cake. First, preheat your oven to 350F. Then mix together your melted butter and cassava in a large bowl with a wooden spoon. This could also be done with a mixer, but being lazy, I just stirred the heck out of it with a wooden spoon. The butter MUST MUST MUST be really well mixed in! Or else you'll form pools of melted butter on the top of the cake whilst you're baking and it'll basically fry the top of your cake. Now mix in the condensed milk and coconut milk:

GLOOP!! Condensed milk.
This reminds me of Coconut Bubble Tea. Mmmm...
And add your Macapuno strings.

WORMS???
Now mix it into something cake-batter looking.

Lumpy cakes!
I lined my glass baking dish on the bottom with banana leaves, since I had some on hand. If you don't have any, just grease the bottom and sides very, very, well. This cassava cake likes to stick.

That leaf doesn't look so square :(
Now pop it in the oven!


Bake it for 1-1/2 hours. The original recipe said 45 minutes, but it wasn't even close to done. I suggest you just put it in for at least an hour, and bake it until it doesn't look like soup in the middle anymore.

Voila!
Golden brown to perfection! (I think) A tip: some people like to put cheese on top of it. If you want to try, just lightly sprinkle it with cheese and pop it back into the oven for 5 minutes or until the cheese melts.

I hope everyone tries this, because it's a culturally different type of cake, and something worth trying. Bye!


Oh, and the condensed version of the recipe:


2 packages Frozen Grated Cassava (thawed)
1 Bottle Macapuno (coconut strings)
1 Can Condensed Milk
1 Can Coconut Milk
¼ Cup Butter (melted)

Preheat the oven to 350F. Mix together the cassava and the butter until thoughroughly combined. Mix in everything else, and pour into a well-greased/banana leaf line 2 quart baking dish. Bake for 1-1 1/2 hours.